Pages

Wednesday, November 19, 2014

1 point perspective cities and rooms

Students followed up their name drawing project with a fairly intense double drawing:  Use perspective to draw a cityscape and a room.  In both cases, students could choose whatever they wanted to go into the city or room.  Here are the rules of perspective we cover and reiterate as we work:

1. When an object goes back in space, lines go back to the Vanishing Point (VP).
2. On round objects, you connect the outermost point to the VP (this is hard to describe)
3. If something gets in between your line and the VP, then the line stops. (overlapping rule)
4.  Front and Back edges match.  (they go same direction.  same for top and bottom.)
5. As things go back in space they appear smaller.


We also covered vertical, horizontal, diagonal and orthagonal.


We used t-squares and triangles to create true verticals and horizontals, which most of the students had never used before.


Wednesday, November 12, 2014

1 point perspective names


We are drawing our names using 1 point perspective.  Here is how we go through that.  

1.  We use a template to trace our letters.  I found a block alphabet and printed it large on 11x 17 paper.  I also drew a top and bottom registration line on them so the students could line them up.  Here is the two templates.


2.  The names have to have at least 5 letters.  Students draw a vanishing point far below in the middle of the name under, also, they trace their ruler under the name to help form some parts of the back edges.
3.  Students draw the orthagonals, the lines heading to the VP.
4. All along the way, I start introducing the basic rules of 1 point perspective.  Here they all are together.
1 Point perspective Rules:
1.  When objects go back in space, the lines go back to the Vanishing Point (V.P.)
2.  On round objects, the outermost point gets connected to the V.P.
3. If something gets between the line and V.P., then the line stops (overlapping.)
4. Front and back edges match (go same direction.)
5. As things go back in space, they appear to get smaller. 
5.  Students have 2 out of 3 parts then.  Fronts and Sides, missing the back edges.  Rule 4 and 5 help to explain how these are finished.
6.  Students embellish the fronts using the worksheet I downloaded from www.awesomeartists.com.


7.  As time allows, students should also add an interesting background.


Here are some of the results.


Wednesday, November 5, 2014

T-Square Linear Drawings

A "Straight" forward drawing project.  (Get it?  Straight?!  Like the lines we use for this project?  Meh.   At least the project is a hit.

Here's how it works:

1.  Students find an image.  This time around we are looking through the 2000's era National Geographics.  Larger better.  Black and white is better too, but not necessary.

2.  Photocopy the images.  This makes them grey scale. Much easier for kids to deal with for this project, especially since it is all about value.

3.  In order to have a nice drawing to work with, we will grid the image and paper, and transfer a LIGHT version of the artworks.


4. Practice.  This project depends on line to make value. No shading.  So I have students attempt a grey scale to match values.  They draw lines using the T-Squares to try and match the overall value of one area to the other.  This is done with pen.


5.  T-squares are interesting tools, and can be very helpful with technical drawings such as with perspective drawings.  Here is how I use them in the class:  Students clip the t-square to bottom edge of the table.  This makes it perfectly perpendicular.   Use this to align the paper, and use masking tape to secure the paper to the desk.  This "registers" the paper square with the t-square.  Then you can use the t-square to draw vertical lines.  with the addition of a triangle, you also get horizontal lines.

6.  Using the method in step 5, students then fill their drawings with pen lines, more to increase value, less where it is lighter.  I allow them to choose the angle, as long as it is consistent.  Vertical is easiest.


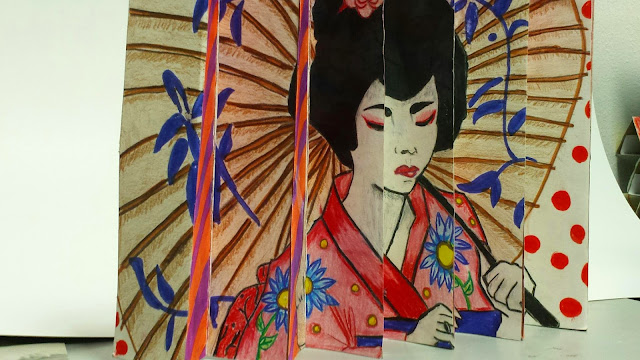
2 view box 2014

Last time we tried this lesson was Spring 2012.  Here is the link.  Directions are the same.

Students generate two artworks, both horizontal. Colored and attached to a triangular poster board base. Here are some steps.


Two-View Box          
Fred Mintert – Knobnoster 2010      Carthage Junior High School
Adapted from                “Scratch Art® 3-VU ®”                                                                            
I saw this idea in the Dick Blick catalog, but at 24 dollars for 6, it was unfeasible.  I re-engineered the lesson so it cost pennies instead of dollars.  Instructions below are for two 8x10 images.  Must be drawn horizontally.
Materials :  Heavy poster board cut to 31x 8 in, 8x 10 drawing paper,  hot glue, white glue
Instructions:       Using rulers, students are to measure and draw the following measurements on the board.  They need to be parallel and perpendicular for this to work well.  The marks should be made with a ballpoint pen with pressure, so they are not just drawing the marks, but also scoring the line.  This makes folding 20 times easier/accurate.   Also add the number 1-5 and Letters A and B where shown.  This is the plan for attaching the images.
On the reverse side, you also need the following marks.  Do not score these.
After these marks are made and scored, then the board is folded, sort of like an accordion.  If you are using one sided poster board, make sure the white side is facing out, with the notations.  Using hot glue, the students pair up and help each other glue down the triangles, starting on the interior, the last one being the tab (glued under.)The point of the triangle is glued down on the marks you made on the backside.  This will form five 2” equilateral triangular box forms.
After this, flip over the two 8x10 in drawings, and again, with a ruler, divide into 2 inch wide strips, 5 total, from top to bottom, like this.  Also lightly add the numbers and letters as shown.

After they are noted, they are carefully cut apart on the lines.  To finish, simply glue the 2” strip on the same side of the triangle that has the same number and letter.  Make sure they aren’t place on upside-down.  Also, I find that laying the strip down on scrap paper, then smoothing out the glue for an even coat makes them stick better and more accurately.
Display:  For the separate images to appear, you tilt the box side to side. So if you are putting on a wall, secure with heavy duty glue or tacks, at eye level.