after looking at Piet Mondrian, students designed and completely abstract radial design. using rulers and compasses they generated geometric shapes. They were then finished using colored pencils and markers. Their minimum requirement was three circles, 1 square, one triangle, per quadrant.
I teach students about art, creativity, and visual problem solving at Carthage Junior High. My wife is also an art teacher, and my three kids are all into their own arts, music, drama, imaginary unicorn development!
Wednesday, November 13, 2013
Monday, November 11, 2013
Friday, November 1, 2013
Hot dog I love that weiner man!
I love VWs, and my principal drives a VW bug. she also loves hot dogs so when I found this box I combined the two! papercraft model can be found at this link. it gets me thinking I think my students will make some papercraftmodels!
It also reminds me of a song my wife remembers from her youth:
I know a weiner man
he owns a weiner stand
he sells most anything from hot dogs on down
one day i'll join his life
i'll be his weiner wife
hot dog i love that weiner man!
he owns a weiner stand
he sells most anything from hot dogs on down
one day i'll join his life
i'll be his weiner wife
hot dog i love that weiner man!
Tessellation portraits
this is a 2 part project starting with tessellations. students use a square of poster board as a template. They design their own tessellation and then apply it to a background. they are then painted in with acrylics using either a warm or a cool color scheme. Meanwhile I take their photographs and I digitally manipulate them using photoshop. I adjust the contrast, changing to grayscale then posterizing it for the students. I print this off and then go back to photoshop and flip the image. 1 more print in we are ready to trace. students put their image on a window and trace the value shapes. the resulting image looks like a paint by number project. using their original photographs for guidance, they paint in different values of color. this is then cut out and glued on top of the Tessellation page.
No. 2 Pencil Project
this lesson comes from Ken Vieth's book entitled "From Ordinary to Extraordinary" where students take a common place object, the pencil, and transform a drawing of their creation into pencils. This visual problem project promotes creative thinking, higher-order thinking, and visual awareness. Many found this project to be a challenge.
It starts with drawing a pencil, noting its component parts and characteristics: Black end, cone, ridges, yellow, black lettering, metal band, eraser. Then students generate an large image on a sheet of drawing paper. This is most successful with these qualities:
Large, line drawing, of a person, place, thing or animal. Should have a blank background, no color, no value, little texture.
Then the transformation begins. All the space within their drawing is filled with pencils. They can be pushed, pulled, squeezed, stretched, to fill the space. No leftover space is allowed. Then they are colored in with the colors of pencils, paying attention to shading to make them appear 3-D.
Monday, October 21, 2013
the Carthage Maple Leaf Parade is one of the largest in Missouri, and its my schools hometown. So I decided this year to represent the ART TEACHERS OF CARTHAGE at the parade! We passed out candy and crayons! The maple leaves covering the bus were created by my students, they used texture rubbing sheets to apply color and cut them out. This way, every one of my students could be in the parade! In fact, 2 JH students joined the teachers in passing out treats. The instructors picture from left to right are:
Mr. Mintert, Ms. Pruitt, Ms. Lage, Ms. Barley (above), Ms. Burnside, and Ms. Mintert (with Ollie our daughter.) The bus is mine, its a 1978 Type 2 Transporter. Lots of Fun!
Wednesday, October 9, 2013
Monday, October 7, 2013
Op Art Cubes

Op art is short for Optical Art- It is a style of art that takes advantage of optical illusions. Artist such as Bridget Riley explored our perceptions. How can it look 3-d when it is really flat? This sub lesson is one such exploration into 3-d op art.
Drawing a
3-d Illusion Cube
You will need:
1 12x 12 sheet of drawing paper.
Pencil
Ruler
Markers.
1. Trace the hexagon on the back of the
instructions onto a sheet of drawing paper.
You may need to use a ruler.
se the ruler to connect the opposite corners. (see picture.)
2. Make a dot 2 inches from the outside on each line.
3. Connect the dots to make a smaller hexagon.
4. Erase every other line in the smaller hexagon.
5. Erase the OPPOSITE every other line in the bigger hexagon.
6. Color opposite sides to match. You will need 3 values. ( a darker, lighter, and medium version of one color)
U
Tessellation Portraits.
This idea comes from Mrs. Kamp at Calver Schools in Baltimore. It takes two projects I have done in the past and blends them together to get one unified, active, interesting artwork: Tessellations and posterized portraits. The images are from her class, (we are going to start ours on Tuesday with tessellations!
| From Mrs. Kamps website |
| From Mrs. Kamp |
here are few patterns that you can follow to construct a tessellation.
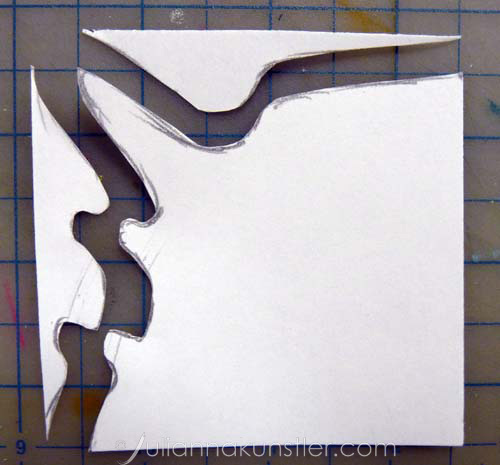
The basic one is "translation" pattern - where you attach the cut out pieces to an opposite side of your shape:
This is an example of a more complex tessellation pattern - "rotation" template. Instead of sliding a cutout to an opposite side - you rotate it.


Now typically, when I do a tessellation project, we spend a lot of time turning these shapes into something we recognize. For this project, we are using this to create an interesting colorful background. While students are starting their tessellations, I will photograph each student and print out a posterized version of their face. Students then trace the lines separating values, (probably only two, light and dark) this line drawing is transferred to the tessellation page, and painted in with tempra.
Wednesday, October 2, 2013
Word animals
This lesson is a follow up to the previous abstract animals lesson.
Students start by drawing an outline of an animal. Next students transform the animal so it also says the animals name.
This is actually a lot more challenging than you might think. Words need to stretch. They need to be organized from left to right. This image needs to be two things simultaneously. A few minutes after being introduced to this lesson a student reminded me that this was very similar to a PBS show Word World. they are finished with tempra on construction paper.
Students found out quickly that they had to maintain the space between the letters. With only two colors and no outline, the space between letters helped to define a shape as a letter.
A quick but very successful lesson.
Subscribe to:
Posts (Atom)