Monday, May 18, 2015

Hexaflexagons 2015

Hexagons are 6 sided geometric shapes.  A hexaflexagon is a hexagon that can flex into different orientations! First discovered by Authur Stone in 1939, I discovered this for the first time at an art teacher conference at a presentation by Marilynne Bradley.  This mathmatical model is a folded paper figure that flexes, sort of like a kaleidoscope.  There are even premade templates on the internet.  Here is one based on Monsters Inc. characters.


In class, we use a compass to mark out and create 10 equilateral triangles to make the paper model.  here are some pics to explain how this happens.  

I set the compass to 6 diameter, and as long as that stays the same you should be able to swing forward and backward to mark the 3 corners of a equilateral triangle.


Friday, May 15, 2015

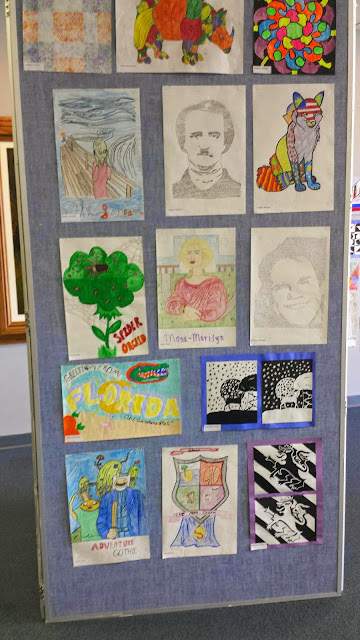
End of the year art showcase

It's that time of the year again  The choir concert brings in hundreds of parents, so I have all my students pick one of their artworks to go on display.  The large tigers were collaborative projects that all students helped with.  They did a great job this year!


End of the year artwork stack

This is the stack of collected artwork from spring semester.  It's all paper here and about 4 foot tall.


Friday, May 8, 2015

Textured mugs

I love textured mugs. They have so much more character than a regular, store bought mug.  I fashioned a die for our extruder from scrap lumber,  so the handles are all more uniform. 

They use slab technique and scoring and slipping.  we have roll sets that include a roll, 2 pieces of fabric, and thickness gauges.  

Students roll out a slab, apply a texture using a texture rubbing sheet, and cut out an 11x4 slab.  
This is then picked up, turned into a cylinder and the ends are scored and slipped together.
The scrap clay from this initial rolling is recycled into a smaller slab that will be used to form the base.  This is attached using S&S, and then cut out and flipped.
At this stage, students make sure there are no sharp edges, no holes, and their name and year is on the base.
they are set to the side for the next day and handles.

The handles are extruded, and usually attached on the seam from yesterday, to facilitate a stronger bond.

Once dry, they are kiln fired to bisque ware.

Glazing is fairly simple, unless the students want to accentuate their textures.  In that case, we use a subtractive method as follows.
 1. They apply 1 layer of glaze they want in the depths of the texture.  Then they take a sponge and wipe flat across the tops of the texture, removing glaze there, but keeping it in the grooves.  The top areas are glazed with a second color, and then clear glaze over it all for a second coat.

Fired again and ready for drinking!

We use a low temp white earthenware.  Cone 04.  Done right, these are functional and beautiful!


Tessellations 2015


Tessellations are a pattern made across a flat surface by repeating a shape with no gaps and no overlaps.  There are many techniques for making tessellations, the technique we will use is called the paper cut method. Students are to trace their tessellation template in their sketch books 4 times and try to envision what it possibly could be. Once they have a good design it is applied to a sheet of drawing paper and colored in with alternating colors.

For fun I tried out the triangle shape and got a wolf's head.  Here it is being traced over the surface using a light box.


Student work

T-square linear drawings

This is a repeat of a lesson I did in November last year.


Wednesday, November 5, 2014

T-Square Linear Drawings

A "Straight" forward drawing project.  (Get it?  Straight?!  Like the lines we use for this project?  Meh.   At least the project is a hit.

Here's how it works:

1.  Students find an image.  This time around we are looking through the 2000's era National Geographics.  Larger better.  Black and white is better too, but not necessary.

2.  Photocopy the images.  This makes them grey scale. Much easier for kids to deal with for this project, especially since it is all about value.

3.  In order to have a nice drawing to work with, we will grid the image and paper, and transfer a LIGHT version of the artworks.

Grid Conversions for 12x 18 inch paper
Measure the short side of the image in Centimeters or Inches. 
CENTIMETERS:  Is it smaller than 10?  DO NOT USE.  IT IS TOO SMALL FOR PROJECT.
CM      size of grid on small image          Size of grid on drawing paper
10       2cm                                                    2 inches
12       2cm                                                    2 inches
18       3 cm                                                   2 inches        

INCHES:  Is it smaller than 4: DO NOT USE.  IT IS TOO SMALL FOR PROJECT.
IN        size of grid on small image          size of grid on drawing paper
4 in     1 in                                                     3 inches
5 in ( try to use 12 CM)
6 in     1 in                                                     2 inches

7 in ( try to use  18 cm)


4. Practice.  This project depends on line to make value. No shading.  So I have students attempt a grey scale to match values.  They draw lines using the T-Squares to try and match the overall value of one area to the other.  This is done with pen.


5.  T-squares are interesting tools, and can be very helpful with technical drawings such as with perspective drawings.  Here is how I use them in the class:  Students clip the t-square to bottom edge of the table.  This makes it perfectly perpendicular.   Use this to align the paper, and use masking tape to secure the paper to the desk.  This "registers" the paper square with the t-square.  Then you can use the t-square to draw vertical lines.  with the addition of a triangle, you also get horizontal lines.
6.  Using the method in step 5, students then fill their drawings with pen lines, more to increase value, less where it is lighter.  I allow them to choose the angle, as long as it is consistent.  Vertical is easiest.

T squares are a technical tool for draftsmen. But they can generate amazing student work!

Here is my example of Lincoln.


And a second with a farmer.


Thursday, May 7, 2015

String art project 2015

7th grade students made curve stitch  projects, commonly called string art.  Here are our steps:

1 I downloaded several templates from various websites as patterns.  Photocopied and set out for students to choose.  They glued them to the back of a piece of posterboard, and glued a black sheet of construction paper to the front.  

2. Once dry, we used push pins to poke holes every where we wanted to stitch.  

3.  Next, students got a section of string. ( I have them get 2 arm lengths at a time)  This string is like kite string, and it comes on a large roll.  Its white, but we will fix that.

3. Students start stitching.  The idea in general is to run a stitch from one location to another some set number of spaces forward.  they both move forward one space, and a "web" is formed.  

4. Since this is not the traditional string art with boards and nails, the process basically means students stitch long lines on the front, and make short trips to the next hole on the back.

5.  The ends of the strings are simply taped down on the back of the board with masking tape.  When they use up the amount they have, they simply come back for more.

6.  The white webs are colored using water based markers.  the string absorbs the ink and with a small amount of water and a brush, they can blend and fill in missing spaces.  This technique cut down a lot on the of task behavior I have had in the past with allowing them to select colored string.

What do you think of the results?  I think they did a great job.