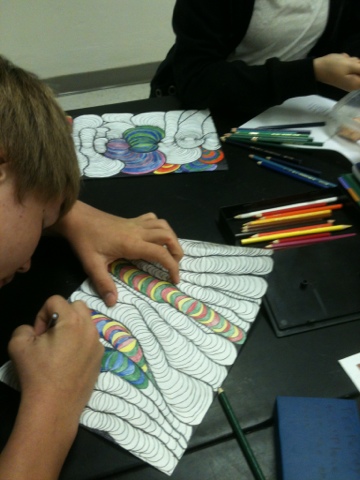
Students are furiously working to get their "worm line designs" finished in class today. the basic concept is easy enough. Seen a lot of good art teachers successfully teach this op art design. Check out
Art with Mr. E, his lesson is great, and others for more inspiration, directions. Here is the presentation we used to introduce op art. By we, I mean my student teacher, Ms. Angér.
The Lesson Plan:
Art Education Lesson Plan
Your Name:
|
Alexandra R. Anger
|
|
Unit Title: Op Art
|
Room Number:
|
|
Grade Level: 7-8
|
Day/Date Lesson Taught: October 2, 2012
|
Time of Lesson: 45 minutes.
|
Lesson Title:
|
Worm Line Design
|
|
Number of Students: 17
|
This is the 3rd lesson of 5 projected lessons.
|
|
Overview of the Lesson
The lesson is based on Op Art (optical art). Keeping in mind movement, rhythm, and pattern, students will finalize their worm-like patterns and begin to add color for effect. Students will review the color wheel and choose a color pallet from which to work.
Rationale
Optical art is a method of art-making concerning the interaction between illusion and picture plane, between understanding and seeing. It is important for students to understand visual illusions and how they easily trick the eye. As students mature in their artistic development they need to gain a higher understanding of what they see and what they think they see. Once a student makes that mental shift, they can begin to build their understanding of other difficult concepts.
Leaning Objectives
· Students will learn that 1)…the color wheel is composed of several different color groups that have a different visual “feel“.
2)…by altering value in the composition, a 3-D effect can be created.
· Students will be able to 1) …develop a worm-like pattern that appears to be 3-dimensional in nature.
2)…identify the different parts of the color wheel.
Student Materials
Ÿ 1 sheet of drawing paper
Ÿ 1 sharpened, wooden pencil
Ÿ 2 Sharpie markers - one fine tip, one bold
Ÿ Colored pencils
Teacher Materials
Ÿ Smart Board - “art start” and “color wheel slide show”
Ÿ www.slideshare.net/myerstho/the-color-wheel
Ÿ Textbook, “A Personal Journey” - Color Wheel, pg.
Ÿ Color - handout.
Ÿ Worm line design example and colored pencils for demonstration.
Concepts/Vocabulary
1. Primary Colors: red, blue, yellow.
2. Secondary Colors: violet, green, orange.
3. Tertiary Colors: yellow-orange, red-orange, red-violet, blue-violet, blue-green, yellow green.
4. Complimentary: colors on opposite sides of the color wheel.
5. Warm Colors: red-violet, red, red-orange, orange, yellow-orange, yellow.
6. Cool Colors: Blue, blue-green, green, yellow-green, violet, blue-violet.
Instructional Strategies and Sequence
1. Motivation/Exploration (dialogue/activity):
The lesson will begin with a brief review of yesterday’s class period. After a brief review, students will participate in a slide-show presentation about the color wheel, and a variety of color choices for their projects. Students will receive a small handout for notes about the color wheel. Students should fill out the slip and keep it for reference.
2. Demonstration:
Students will be asked to gather around a central table for a short demonstration on coloring technique. I will demonstrate how one might choose a particular color scheme and fill in sections of the “worm line design” with value to accentuate the 3-D effect of the project.
3. Students activity/Process:
Students will independently choose a color scheme and will use the remainder of class time to work on their own projects. Students should demonstrate an understanding of the coloring process and complete the task neatly.
4. Cleanup (procedures, monitors):
At 4 minutes before the bell, students will be asked to stop what they are doing and listen for instructions. Students should return all colored pencils to the center of the table and make neat stacks of artwork at the end of the table. I will personally collect all sharpies and stacks of artwork.
5. Closure (Summary/Review):
Shortly before clean-up, I will tell students what to expect for the next class period and make sure there are no questions about the project. If there are questions, they will be addressed aloud for the benefit of the whole class.
Assessment
At the close of the lesson, students will complete a self evaluation. They will score themselves on a rubric and demonstrate knowledge of terms covered in class. I will calculate the final grade using a similar rubric that will assess terms covered, craftsmanship, use of class time, and success of the project.
Modification:
Students with special needs may be given extra time to complete the work. Alternative instruction may be given to reinforce a shorter, more clear set of expectations.
Extensions:
For students who may need mor challenging work, a larger-scale work would be an option. The student would complete the work using extensive detail and multiple color schemes.
References:
Ÿ Classroom Textbook - “A Personal Journey”
Ÿ Art with Mr.E - Blog (line design)
We also introduced color theory through this presentation from SlideShare and a worksheet.
here is the text from the worksheet.
Color Wheel
Primary Colors: ____________, ____________, and ____________.
Secondary Colors:
Ÿ Red + Yellow =
Ÿ Blue + Yellow =
Ÿ Red + Blue =
Tertiary Colors:
Ÿ Yellow + Orange =
Ÿ Red + Orange =
Ÿ Red + Violet =
Ÿ Blue + Violet =
Ÿ Blue + Green =
Ÿ Yellow + Green =
Complimentary Colors: Colors that are _______________ each other on the color wheel.
Warm Colors:
1.
2.
3.
4.
5.
6.
Cool Colors:
1.
2.
3.
4.
5.
6.
and finally, the OP art Powerpoint, on google docs.