After learning about contour drawing, students attempted a still life with skulls, bones and flowers. On the last project, students used markers and water and a brush to create realistic shading. They are using the same technique on bones to give them value and shading! This is a link to another art teacher who has a wonderful lesson and examples of high school students working out the same process.
I teach students about art, creativity, and visual problem solving at Carthage Junior High. My wife is also an art teacher, and my three kids are all into their own arts, music, drama, imaginary unicorn development!
Showing posts with label marker. Show all posts
Showing posts with label marker. Show all posts
Wednesday, February 3, 2016
Wednesday, January 27, 2016
Ribbon letters 2016 spring
These are the results from this Semesters attempt at ribbon letters. It starts with cursive, finished as a 3-d ribbon! Check out this previous post for the details on how that is done.
1. Cursive. Students are supposed to learn this in 2-3rd grade, but some do not have practice. I print out an example Cursive alphabet for them to use. This one is called D'Nealian, a offshoot of Palmer Method.
Each student picks a name, phrase, etc that is at least 5 letters long. They can capitalize the first letter, but the illusion of a single flowing ribbon is better captured if the rest are a string of lowercase letters.
2. The 3-d illusion begins by picking a direction and length. I like using about 1 inch, and up to the left at 45 degrees. Students will draw small extensions off each corner or rounded edge at the chosen angle and length, with one caveat: If something else gets in the way, the line stops. this helps make the illusion of OVERLAPPING.
3. The line component of the illusion is completed by finishing off the back edges. Basically, you re-create the curves so it remains the same distance away from the original. the original curve is in between the lines you created on the original cursive lettering. See the examples below with the name Carthage.
4. Value: I usually have students use markers to outline the design and use colored pencils to fill in with value. Gradual shading from light to dark helps the ribbon look rounded. Also, when a student switches from one ribbon section to another one touching, they need to switch from light to dark, or vice versa. this gives the greatest amount contrast to showcase the 3-d lines.
Rubric
Cursive Lettering 20
3-d lines correct 20
Gradual Shading
on ribbon 30
Background 10
Craftsmanship 20
Total 100
Wednesday, December 17, 2014
rotational printing design
Another winning project gathered from my Professional Development with Missouri Art Educators Association. Leesha Dunkeson from Knobnoster Middle presented this project at the 2014 fall conference.
Students use small printing plates from foam to repeat a design in a rotation. Markers are the ink. This gets results fast!
Here are the directions:
Wednesday, October 2, 2013
Parabolic curve lesson
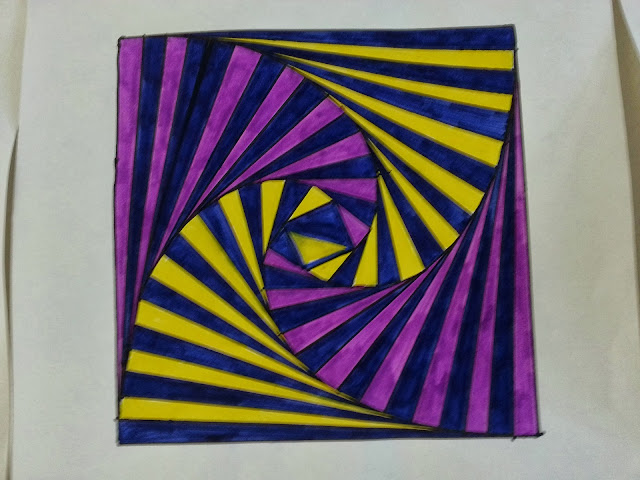
Using a square template, these designs are created using your finger as as spacer and a parabolic curve its formed!
 |
| Start with a 12x12 sheet of paper. |
 |
| Trace the 11x11 square template. |
 |
| Use your finger as a spacer and measure and mark one edge, rotate the paper mark the same location all around. |
 |
| It should look like this. |
 |
| use the straight edge of the template to connect the dot on one side to the dot on another. 4 new lines, smaller square is made, slightly tilted and inside the first one. |
 |
| a curve naturally starts forming . |
 |
| Repeat the process on the new square, making sure the same side is used. the dots go on the edge of the new square 4 dots, 4 lines, new square is made, smaller and inside the second one. |

 |
| finished design colored. |
Subscribe to:
Posts (Atom)


